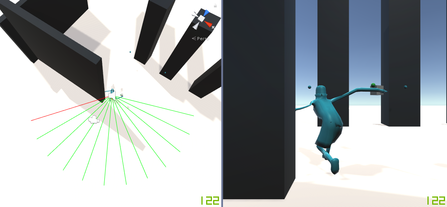
 A ray cast has hit a wall before the player character has been occluded, giving the camera an opportunity to swing away from the wall. A ray cast has hit a wall before the player character has been occluded, giving the camera an opportunity to swing away from the wall. During week 1, we had developed a clear outline of what we aimed to achieve for the vertical slice. During week 2, the discussions on the game’s direction scaled down and it was full steam ahead for production. My two priorities for this week were the AI pathing tool and improvements to the game's camera. The prototype for the game only had players traversing the environment on a 2D plane. With the introduction of platforming elements and increased player mobility, the camera needed to be updated to accommodate this. I added vertical movement to the camera to give players more control. The smoothness of the camera’s movement was also improved by making the camera a separate object, and not a child of the player character as it previously was. By doing this, I could have the camera follow the player character and ignore the small movements the player may make when moving the player character, which could make camera movement jerky. I made an update to the camera’s follow behaviour which only followed the player character when the player character was grounded or falling. This was done because having the camera follow the player character upwards every time they jumped is distracting. Of course, it was also important to make sure the camera didn’t clip through walls and objects. A clipping prevention check was implemented in the prototype but it is now more robust as it using a sphere cast instead of a ray cast to check for occlusion. I also attempted to implement a camera swing mechanic to improve the smoothness of the camera. This is used in 3rd person games such as Journey and Ratchet and Clank and occurs when a player is about to turn a corner and become occluded from the camera. Rather than pushing the camera directly in front of the wall, which can be jarring if done too quickly, the camera anticipates the occlusion and swings around to maintain the view of the player. This is commonly implemented using a series of ray casts directed from the back of the player, at equal distances apart. When one of the rays detects an object, the camera should swing to counteract it. The difficulty came in defining the rules that determine when the camera should swing. Of course, it some situations it does not make sense for the camera to swing even when a ray hits an object e.g. if the player is facing away from the wall. This feature is approximately halfway complete and I will continue developing it in week 3. During the first week, I had learnt enough about Unity’s Editor API to build a simple and intuitive tool for mapping the AI’s patrol paths. The system I implemented creates a series of empty objects which hold a script that defines the AI’s behaviour along each point of the path. The tool lets us set the position of each point, define how long the AI agent should wait at that point, and what rotation they should look towards if the agent is waiting. I added a button to the inspector of the path point script which creates a new point after the selected point and automatically selects it. I made this process even easier by making a GUI button which is drawn in the editor scene view next to each point, which holds a ‘+’ symbol and adds a new point at that location when clicked. This simple addition makes using the pathing tool more efficient for the team because we don’t need to be constantly clicking back and forth between the scene view and inspector. I ran into an issue while developing this tool due to how gizmos work in Unity. I use gizmos to show the position of path points (they are empty objects) and the connections between these points. Older versions of Unity let users click on gizmos in the editor to select the object they were drawn by. Unfortunately, gizmos no longer work this way and after much trial and error I gave up on making the gizmos clickable. Instead, I elected to use another GUI button in the scene view, just like the ‘+’ button which allows us to easily select and move any point. 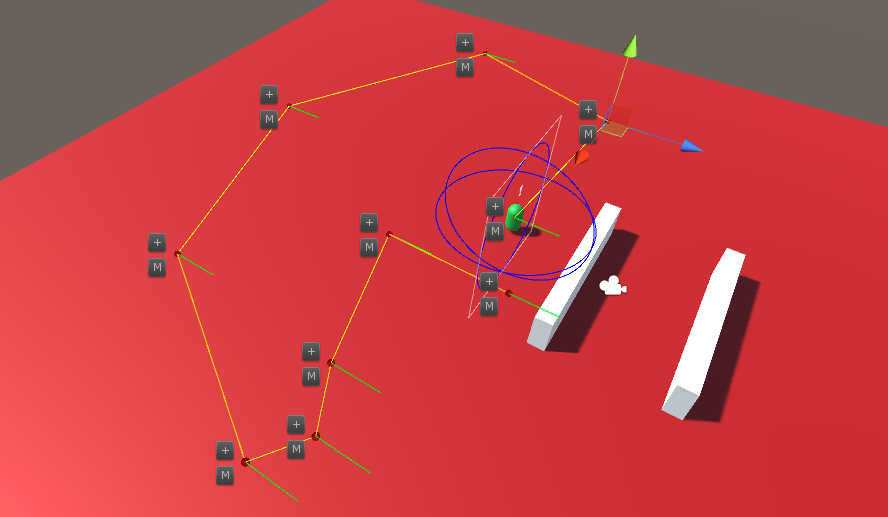 The path editor GUI only appears when the path controller or a path point is selected. I updated the AI controller script to use the points created in the path editor. The AI agents follow the points, and if the point has a wait time, the agent will wait and rotate to the specified direction (the direction is represented by the green lines). The AI’s states were fleshed out to better handle reacting to the player. When an AI agent sees the player while patrolling, they will begin chasing the player. If the agent loses sight of the player, the agent will travel to the player’s last known location and search from there. This last known location is static, so all AI can have access to this information as if they are talking to each other. The values for alert time and search radius can be set outside of the script. The AI agent will keep generating random points on the NavMesh within a search radius in front of the player’s last known location and travelling to those points until the alert time has expired or the player is found. If the alert time expires, the detection level will reset and the agent will return to their path.
The speed of the AI agent varies. While patrolling, they walk at a regular speed. While chasing the player they will speed up. And when they are searching they will be slower, as if they are searching very carefully. I will make these values editable outside of the script to use for testing. Finally, I also helped other members of the team with a few problems. For example, I improved the input for running along ropes in Dylan's script. This implementation compares the analogue stick input in relation to the camera's forward vector to the direction of the rope. This means that the player can push the analogue stick in the direction of the rope irrespective of which direction the camera is facing to traverse. There is a 30-degree leeway to this, so players don't need to be perfectly accurate. I also helped Zac set up an editor script for his laser system, which will later make our jobs easier.
0 Comments
Leave a Reply. |
AuthorContrary Scholars ArchivesCategories
All
|
 RSS Feed
